The Pharo Prince of Bel-Air
2021-01-24
Recently I have been aiming to explore the Pharo programming language. The close combination between the language and the Integrated Development Environment (IDE), makes it quite unlike most other languages that I have encountered. You can, for example, inspect every program element in a visual environment, even on a currently running program. While exploring, I spent much time using the Playground feature, where you easily start executing, and interacting with, small snippets of code.
While exploring the language, the intro-song to the tv-show "The Fresh Prince of Bel-Air" got stuck in my head. The song tells the story of the title character, Will Smith, on how he ended up being "The Fresh Prince of Bel-Air". To paraphrase the song, Will was born and raised in Philadelphia, spending much of his time on the playground. On one occasion, while playing basketball, he got into a fight with some troublemakers. This experience got his mom scared so he was sent off to live with his aunt and uncle in Bel Air. After a flight and a taxi ride, he arrives in Bel Air at his uncles and aunts house, to become "the Prince of Bel-Air".
In this article, let’s explore Pharo together with the story from “The Fresh Prince of Bel Air”. If one wants to follow along, feel free to download and setup Pharo. The language has a really smooth process for getting started, as one can download and install the Pharo Launcher and be pretty much set.
It is difficult to do the language justice by text, because it is so intertwined with the IDE and image based development. I will try to illustrate things as best as I can.
Once we have installed and started the Pharo Launcher the first step is to create a Pharo image for our project. One can think of a Pharo image, as a store of all the objects created by the program. This not only includes what would normally be represented as files of source code of other languages, but also the objects of the running program, as well as the state of the editor. As an example, suppose we create an application for taking notes, and while developing, we create two notes to experiment and play around with. We can now save the Pharo image including these objects. The next time we start the image our notes will be there, alongside with the state of the IDE as we have left it. This can help tremendously when developing or debugging a new application.
To come back to our "The Fresh Prince of Bel-Air" example, first we are going to create an image which will contain our project (see a screenshot of this below).
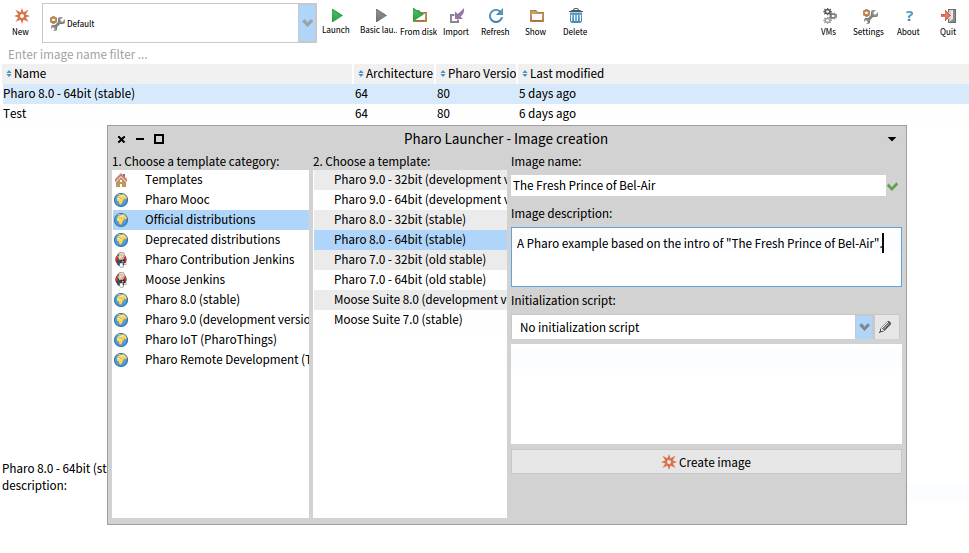
Creating a Pharo image for our 'The Fresh Prince of Bel-Air' example.
In the Pharo launcher, we can click on the "New" button and get a dialog window for the image that we want to create. We base our image on the last stable Pharo version, which is at the time of this writing version 8.0, enter a name and a short description for our image and click "Create Image".
In a short order our image is then initialized, and we are greeted in our IDE by a welcome message, and some guides and documentation in a menu. I highly recommend the “ProStef” tutorial from this set of guides.
Our next step is the playground which, as mentioned at the start of the article, is a place for experimentation and playing around with code that we are going to develop. One can open this Playground from the menu "Tools" on the top of the screen by selecting "Playground" or by the shortcut CTRL+O+W.
Note that the shortcuts might be different depending on settings and operating systems, as the command key might be either CTRL, CMD or ALT. Thankfully the IDE shows shortcuts very neatly next to the clickable menu options, so they should be easy to figure out and learn.
Once the Playground is open we have a canvas where we can start to write and execute our code.
Before I get into the actual creation of the example I will briefly try to summarize how Pharo as a language works. In Pharo everything is an object and any computation is done by sending messages to objects. Creating such objects is done through specific objects known as classes, which define structure and behaviour of the objects they create.
These classes are organized into hierarchies. Hierarchies allow you to reuse behaviour. A class lower in the hierarchy, the so-called subclass can inherit the behaviour of a class higher in the hierarchy, called a superclass. At the root of this hierarchy is the class named Object, which ensures as we noted that anything we create is by definition and behaviour an Object.
We call the objects created by the class as their instances. The methods of an object specify how the messages an object receives should be handled. When an object receives a message it aims to find the method that has the same name as the message to handle it. An object also encapsulates data, such as dates, numbers, strings and other objects, based on what the object represents into variables. It can use this data to help handle the messages it receives.
An object can refer to itself by using the special identifier self. In order to create a new object of a class, the initialize message needs to be sent which gets handled by the initialize method, though often the message new is used as a shorthand for this.
For people with some experience with another Object Oriented programming language the above description should sound familiar. One thing that stands out for me on a first glance is how consistently the use of objects and message passing is applied within Pharo. Everything is an object and interaction seems to always happen by message passing. The above summary should hopefully be enough to follow the examples below but for a more in depth look I highly recommend the Learning Object-Oriented Programming, Design with TDD in Pharo book.
Now given the above description of Pharo, we want to apply it by creating a representation of what happens in the intro song in "The Fresh Prince of Bel-Air" by sending messages. In particular we want to represent the character of "Will Smith" in the intro as an object and the changes in location and activity based on the intro song.
So let's start off by creating a new Object representing Will. We aim to do this by instantiating a class called FPWillSmith by typing the following into the Playground.
will := FPWillSmith new.
Here we want to send the New message to the class FPWillSmith to create a new object of this class and assign it to the variable will. Let us quickly go over the syntax elements for this statement.
The operator := is used in Pharo for assignment, and in this case to assign our new object instance to the will variable. We also send to class FPWillSmith, functioning as the receiver, the message new to create a new instance of it. Messages like this that are sent to an object without any additional information are called unary messages. These are always in the form of receiver message. Lastly, statements in Pharo are separated/ended by a .. This can be omitted in many cases but we keep it around in our examples to show its use.
To execute this statement we can right click it and select 'Do It' or use the short-cut for this CTRL+D.
After doing this we will get the following dialog:
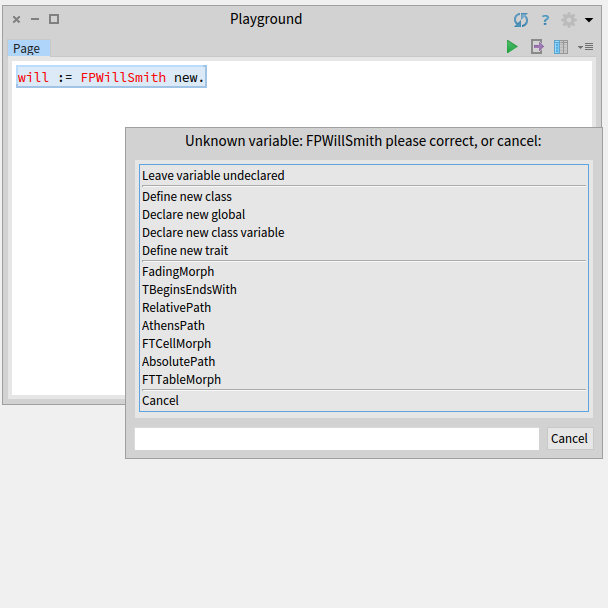
We did not define what we mean by FPWillSmith which brings us some options on what to do now.
Well, whoops it seems we kind of forgot to define our class FPWillSmith, so we get a notification for it. The reason why I am highlighting this error is to show that unlike many other languages, where you would just get an error at either compile or runtime, the system brings up a dialog to help us solve this issue. The only other language where I experienced a similar dialog was with CommonLisp.
So lets click "Define a new class" and give a class definition as follows:
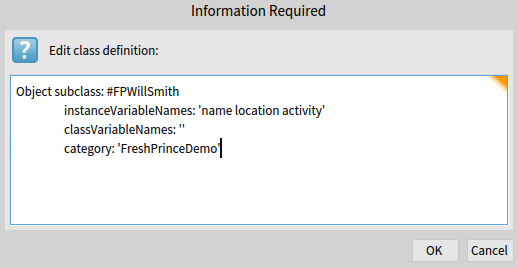
We define a class FPWillSmith, to ensure that every object of this class holds some data about the object's name, location and activity.
A few things to note for this code in this picture:
Object subclass: #FPWillSmith
       instanceVariableNames: 'name location activity'
       classVariableNames: ''
       category: FreshPrinceDemo
Much like every other part of Pharo, the creation of a new class also happens through message passing. Here a keyword message is sent to the Object class to define our new class. Unlike unary messages, these messages use one or more keywords to send additional object information along with the message. These are defined in the form of receiver keyword1: object1 keyword2: object2 ... where the keyword and object pairs make up the message to the receiving object.
We will go over the objects sent in the message one by one. The subclass part of the message defines the name of our new class FPWillSmith. The # in front of FPWillSmith indicates a symbol that is globally unique, unlike a string, which is part of the requirement for this subclass message. Next is defining the name of the instance variables using the keyword instanceVariablesNames, that will represent the elements of an instance of FPWillSmith that we would like to use. There are also classVariableNames that describe such elements for the class itself as opposed to the instances, but here we do not define any. Finally, there is a category defined as FreshPrinceDemo, that is essentially the name of the package that we are currently defining.
Now that we have created our FPWillSmith class, we can now take our original statement:
will := FPWillSmith new.
and execute it, by right clicking it and selecting 'Do It', or using a shortcut such as CTRL+D. As you can see, we now don’t receive errors.
What we would like to do is to double check, whether the object we created is what we want. Pharo has a really neat feature for inspecting any object. We can right-click this statement in the playground and select 'Inspect It' from the menu, or using the shortcut CTRL+I for giving us the object inspector. This should give us a window such as this:

Inspecting our newly created object.
As we can see from the inspector, while the object has all the instance variables that we wanted (name, location, activity), the value for this is nil which is not what we want.
In order to make sure there are meaningful values for these variables for a new object, we need to define our own initialize method that will get called for every new object.
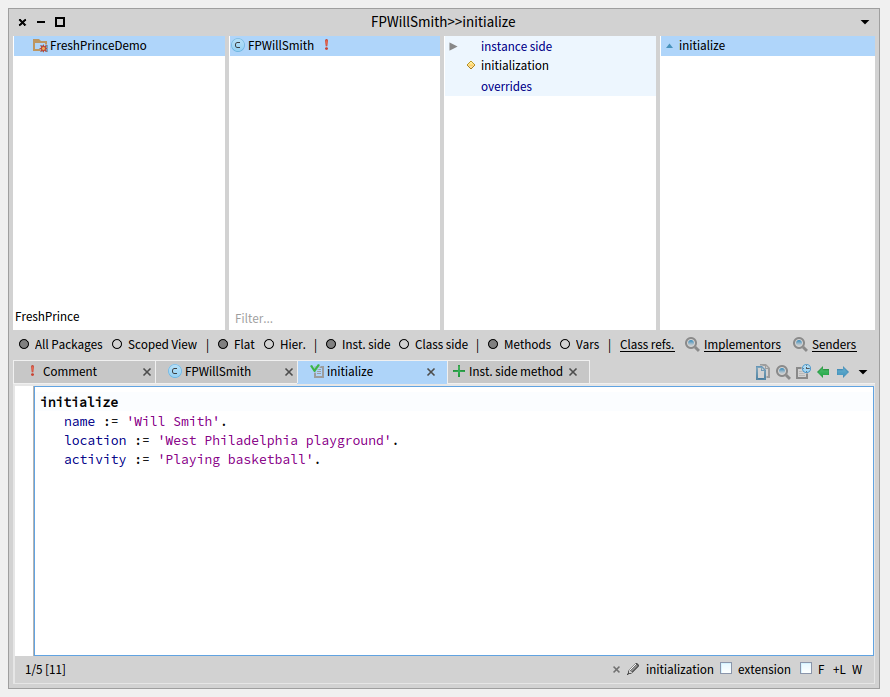
First we are going to look up our class in the code browser. This can be done by clicking the menu options Tools and then Systems Browser, or by using the short-cut CTRL+O+B.
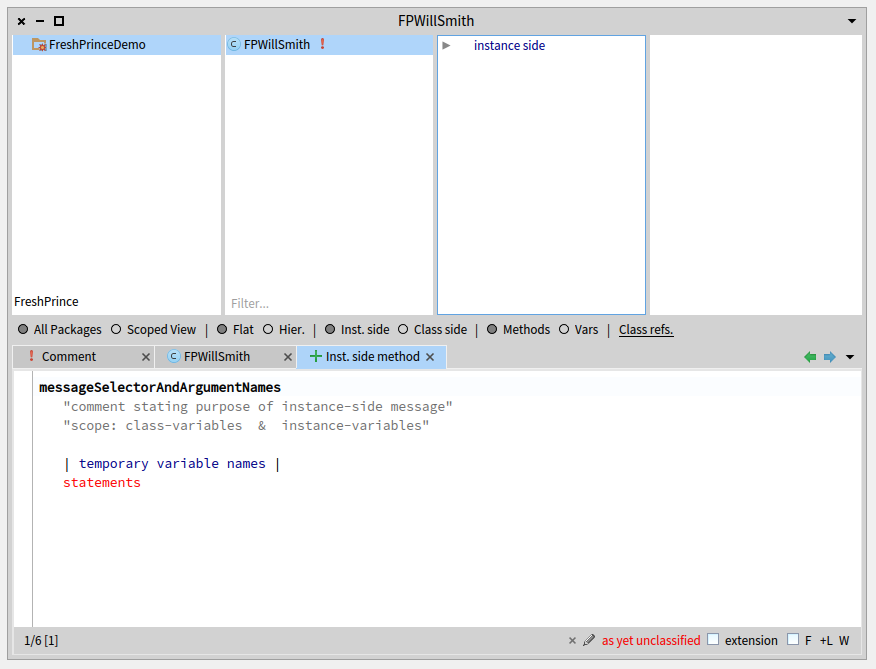
The System Browser, where we filtered for our new Package and selected our `FPWillSmith` class , showing the template for a new method.
The system browser can be used to find, organize and edit classes and methods for all packages within the Pharo image. It is divided up into four columns. The leftmost column lists the packages. We can use this to filter for our new package named 'FreshPrinceDemo'. The second column on the left details the classes in the selected package. For our new package we should only have one class here: FPWillSmith. The third column lists all the protocols of the selected class. Protocols are a way to group together related methods, which makes for easier browsing and search. Finally the fourth column from the left lists all the methods, for the given class or selected protocol.
The panel below these four columns is also very interesting. If one selects a package, it shows in a tab a template for defining a class. If one selects a class, it shows a tab for a template on how to define new methods. It also has a tab for the class definition itself .
In order to proceed let's use the method definition template to define our new constructor, as follows:
initialize
	name := 'Will Smith'.
	location := 'West Philadelphia playground'.
	activity := 'Playing basketball'.
which we can fill into the new instance side method window below, instead of the template code.
What this definition does is to create a constructor, that sets the values for name, location and activity to values that makes sense, given where Will is and what he is doing in the beginning of the "The Fresh Prince of Bel-Air" intro song.
Make sure to accept these values, using right click on the panel and selecting Accept or by pressing the shortcut CTRL+S (you might also need to save your name as the author for this piece of code in a dialog along the way).
We will now have the initialization method defined:
The System Browser showing our newly defined constructor method.
We can check whether our new constructor has worked by inspecting the statement we initially created in the Playground:
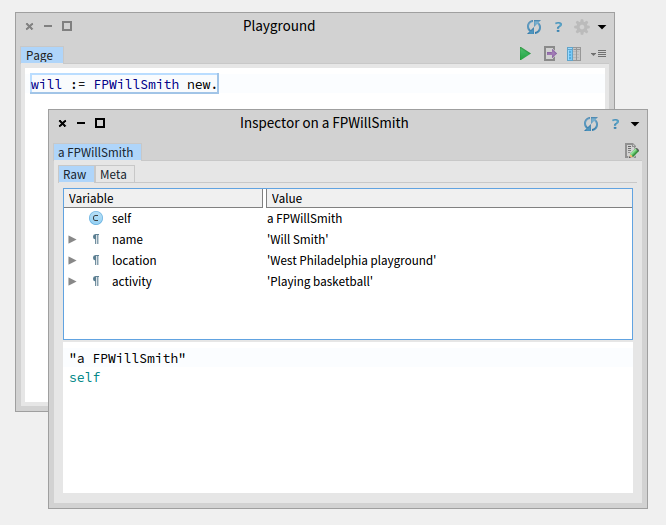
Inspecting the new instance after saving our new constructor.
Now the will representation of the character has the right name, location and activity, but we want to express a bit more of the intro song. We will do this by sending messages to the will object after which we expect that the location and the activity changes accordingly.
Let's assume we instead have the following in the Playground:
will := FPWillSmith new.
will getsInTrouble.
As we can now expect, executing ('Doing It') of the second statement will not go well as we did not yet define a way for the object to handle this message. In fact this message will bring up the debugger because the object does not know how to handle the message getsInTrouble.

We go into the Debugger when the object can not handle the getsInTrouble message.
We can fix this by defining a method, named getsInTrouble. We can even do this from the debugger by clicking on the Create button at the top of the debugger to define getsInTrouble method for the FPWillSmith class. After getting a popup for picking a protocol, which we do not need to do for this tutorial, we get the window showing a placeholder definition for the method:
getsInTrouble
	self shouldBeImplemented.
We want to replace this with the following definition, that updates the activity of the object:
getsInTrouble
	activity := 'In trouble'.

The getsInTrouble method defined in the debugger, after which we can proceed, with the tool-tip of the proceed button highlighted.
We have now created the method from inside the debugger, while the execution of the code was put on hold! With the definition saved we can even click the Proceed button on the top of the debugger to continue from where we halted.
Now the code correctly executes and when we next inspect the last statement have the activity properly updated.
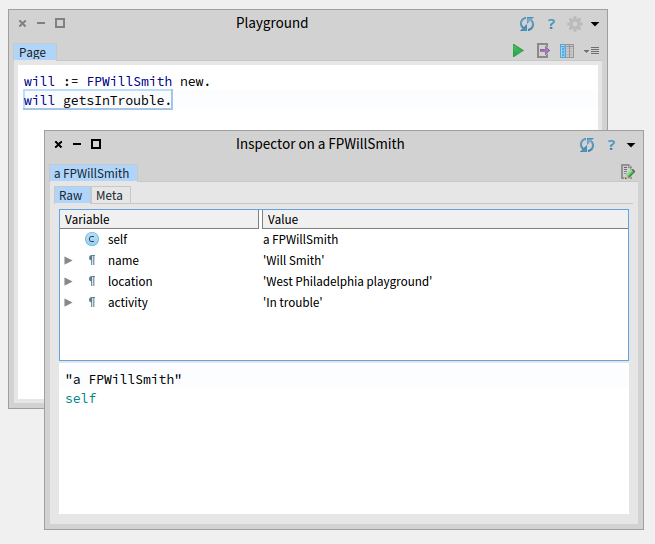
The activity now properly updates on the object after receiving the getsInTrouble message.
For the final piece we will define a method for sending the object to aunt and uncle, with the following definition:
sentToAuntAndUncle
	activity := 'Being the Prince of Bel-Air'.
	location := 'Bel-Air'.
If one follows along, we will leave it up to you on where to define this method from, the debugger or the system browser.
Once we have defined it we can put the following in the Playground:
will := FPWillSmith new.
will getsInTrouble.
will sentToAuntAndUncle.
and inspect our object:
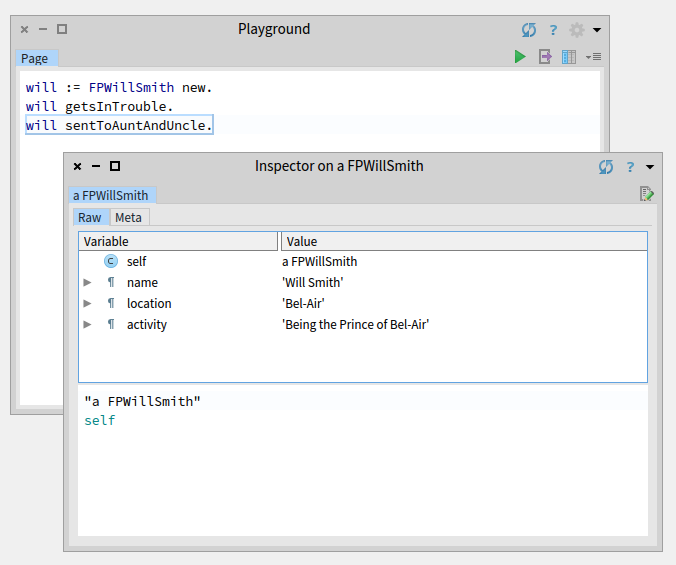
The object now shows the new updated activity as 'Being the Prince of Bel-Air' in the location 'Bel-Air'.
That is it for this short tutorial. I hope I have shown a small glimpse of why Pharo is such an interesting language.
We have started with no definitions at all, and slowly built up what we wanted to do in a very organic way. We just started putting the statements down in the Playground for passing messages to objects, and created the definitions as we went along. Whenever something has given an error in the debugger or did not show up to our liking in the inspector, we slowly added more code. In the process we have evolved an object that initially represented no aspect of Will's character, to something that had a name, location and activity, including; “Playing basketball” in a “West Philadelphia playground”.
And at the end we are now finally there,
having the object's activity denoted as Being the Prince of Bel-Air.