Star Wars Trek
2022-08-26
Recently I started to do the latest version of the course Practical Deep Learning for Coders from fast.ai. I am very much enjoying the hands-on approach of the course and it is quite amazing to see how a deep learning based image classifier could be built with very little code. In the first chapter of the book that accompanies the course a model is trained to recognize whether an image depicts a bird or a forest. In this article, as an exercise, I will instead create a model that can recognize if an image of a spaceship is from Star Wars or from Star Trek.
I will list all the code I used for creating and using this model in this article, with a brief description after each code fragment on what it does. The code is very similar to the code used in the the first chapter of the FastAI book, as in both cases we are aiming to recognize whether an image belongs to one of two categories, with the same setup. If one wants to follow along, I can highly recommend using a service such as Colab to get started quickly but a local install also does work. Chapter 1 of the book is directly available on Colab as well.
Now let's get to the code used:
! [ -e /content ] && pip install -Uqq fastbook
import fastbook
fastbook.setup_book()
The first part is installing and setting up all the dependencies. Assuming we are working in Colab we need the first line to install the dependencies. If we work in our local (virtual) environment we can just do a pip install fastbook instead.
from fastbook import *
The next part is importing all the things we will need from fastbook. For the purposes of this small tutorial we will just import everything.
searches = 'star wars ship','star trek ship'
path = Path('star_wars_or_trek')

if not path.exists():
    for o in searches:
        dest = (path/o)
        dest.mkdir(exist_ok=True, parents=True)
        results = search_images_ddg(f'{o} photo')
        download_images(dest, urls=results[:200])
        resize_images(dest, max_size=400, dest=dest)
Next we are going to gather the images based on which we will create and test our classifier. The above code will set up a directory called star_wars_or_trek, assuming it does not exist yet, and will search for images using the phrase star wars ship and star trek ship using DuckDuckGo. The found images will be downloaded in sub-directories called star wars ship and star trek ship containing the respective images. Finally we are going to resize the images that we download to a comparable maximum size.
failed = verify_images(get_image_files(path))
failed.map(Path.unlink)
The next step is verifying that all the images we got are valid image files, as things can go wrong during search and download. If they are not valid images we can remove them from our dataset.
dls = DataBlock(
    blocks=(ImageBlock, CategoryBlock),
    get_items=get_image_files,
    splitter=RandomSplitter(valid_pct=0.2, seed=42),
    get_y=parent_label,
    item_tfms=[Resize(192, method='squish')]
).dataloaders(path)
The datablock is where all the elements are setup that are required for learning our model. It specifies that we want to learn from images and want to derive categories from it, i.e. whether an image is a Star Wars ship or a Star Trek ship. It uses the data from the files that we have downloaded.
One very important aspect of creating a model is to ensure its predictions are accurate. A way we can test it is to set some portion of the data aside that we will use for evaluation as opposed to learning. In this case we use 20% of the data randomly selected for evaluation.
We also specify that the label for each images can be derived from the directory that they are in. Finally we aim to apply a transform to the images, to standardize them in a way that helps the training of the model.
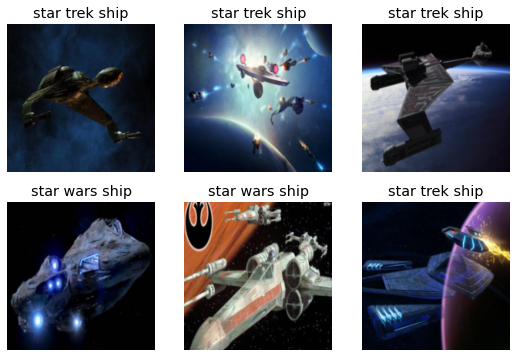
dls.show_batch(max_n=6)
A good way to check if our datablock is setup correctly is to show a batch images, in this case six, from our datablock. This can give us a set of images, such as the one below, that we can visually inspect before we start our learning.
learn = vision_learner(dls, resnet18, metrics=error_rate)
learn.fine_tune(3)
The above two lines kick off the actual learning, i.e. the creation of a model that can differentiate between a ship from Star Wars and Star Trek, based on our setup of the datablock. One of the great things for image based models is that there are pre-trained models that exist, such as resnet18 that have been trained on a lot of images. This means that we do not have to start our image learning from scratch. Instead we can use this existing model as a starting point and fine tune it to our task at hand: the recognition of the right class of spaceship.
Here we just do 3 iterations of fine tuning. The output from this fine tuning can be seen below. The results will vary for each run of fine tuning, but this will hopefully illustrate the process:
epoch	train_loss	valid_loss	error_rate	time
0	1.236515	0.963507	0.323944	00:07
epoch	train_loss	valid_loss	error_rate	time
0	0.531795	0.751966	0.281690	00:10
1	0.419798	0.844729	0.225352	00:10
2	0.312620	0.631814	0.197183	00:10
In this case model was trained on desktop with a GPU but doing this on Colab is also very fast. We can get an error rate at around 0.2 with this setup which is good enough for our short article. That said it would be interesting exercise for the future to see how we could get this error rate down or to examine what are the examples where the model finds it difficult to predict the right category.
Now that we learned our model we would like to put it to use by giving it an image to classify. We have two options on how to do this:
uploader = widgets.FileUpload()
uploader
When using a notebook we can have a widget with a file selector, with which we can upload the image we would like to classify.
uploader = SimpleNamespace(data = ['images/stardestroyer.jpeg'])
# uploader = SimpleNamespace(data = ['images/enterprise.webp'])
We can otherwise just load in the image from our (local) drive as well. Here one line is commented out so we could quickly switch between two options for images.
img = PILImage.create(uploader.data[0])
is_star_wars,_,probs = learn.predict(img)
print(f"What ship is this?: {is_star_wars}.")
print(f"Probability it's a star wars ship: {probs[1].item():.6f}")
print(f"Probability it's a star trek ship: {probs[0].item():.6f}")
The final part is taking the image that we now added and asking the learned model to predict what kind of ship it is. With the above code we will print out both the category of the ship as well as the probabilities attached to the category. This will give an indication of how confident the model is in the prediction.
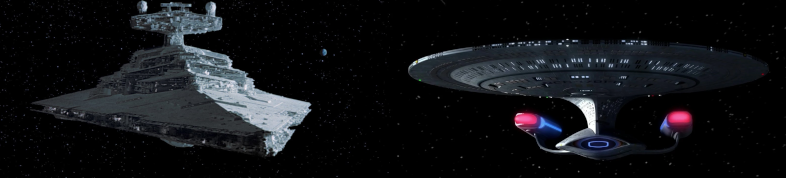
If we use the image of a Star Destroyer from Star Wars, that is displayed on the left at the start of this article, our model will predict with very high confidence that it is a ship from Star Wars.
What ship is this?: star wars ship.
Probability it's a star wars ship: 0.999536
Probability it's a star trek ship: 0.000464
Similarly, if we use the image of Enterprise from Star Trek, the model will have classify it correctly with very high probabilities.
What ship is this?: star trek ship.
Probability it's a star wars ship: 0.000007
Probability it's a star trek ship: 0.999993
In both cases the model can classify these iconic spaceships really well. It is really cool to see how little code is required to create and use a model for these type of predictions with fast.ai, which I think it is pretty amazing. I can not recommend the book/course Practical Deep Learning for Coders enough and will definitely hope to dive deeper as I go along.